Are you a restaurant owner in New York City dreaming about expanding your dining space outdoors? Before you set up that cozy outdoor dining shed, there’s quite a bit to consider.
Let’s embark on a journey to understand how you can create the perfect sidewalk café experience for your guests, step by step.
Understanding the Basics of an Outdoor Dining Shed
Firstly, an outdoor dining shed is more than just a few chairs and tables thrown together outside your restaurant. It’s an extension of your space, a haven for diners who prefer the fresh air of the bustling city streets while enjoying their meals.
The Perks of Having an Outdoor Dining Shed
Imagine your guests sipping coffee or enjoying a meal, enveloped by the unique ambiance of NYC’s streets. It’s not just about additional seating; it’s about creating an experience. But before diving into the wonders of alfresco dining, let’s get the formalities sorted out.
Alright, let’s dive into the details you’ll need to grasp before you set up your very own outdoor dining shed in the bustling heart of New York City.
Step-by-Step Guide to Securing a Permit for Your NYC Outdoor Dining Shed
1. Do Your Research
Understanding the rules is super important. Think of it like knowing the rules of a board game before you start playing.
Size Matters
Firstly, your dining shed can’t be too big or too small; it has to be just right. NYC says your shed should not be wider than your restaurant’s storefront. Imagine your restaurant is 20 feet wide; that means your shed can’t stretch out wider than that. And height? Keep it under 14 feet tall so it doesn’t look like it’s trying to touch the sky.
Picking the Perfect Spot
Location is like picking where to sit in the cafeteria. You want a spot that’s cool, but not in the way. Your shed should leave enough room on the sidewalk so everyone can walk by without having to squeeze through. This means you’ve got to have at least 8 feet of clear space from your shed to the curb.
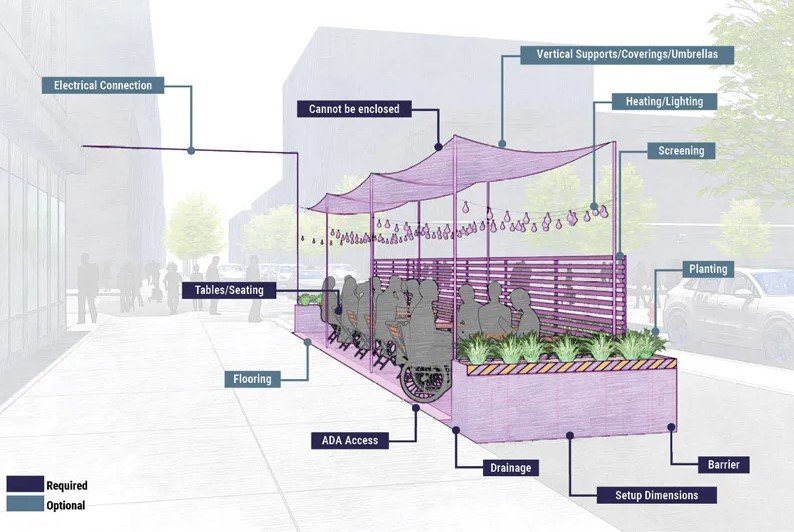
Designing Your Shed
Design is about making your shed look awesome and safe. Use strong materials that can handle rain, snow, and the hot sun. No flimsy plastic or cardboard, please! Think about using wood or metal, and include a roof so your diners won’t get dripped on if it rains.
Examples and Specifics
- Size Example: If your café front is 25 feet wide, your shed should be 25 feet by 8 feet—no more, no less.
- Location Tip: Always measure twice! You’ll want to have exactly 8 feet from the edge of your shed to the street curb. No guessing!
- Design Advice: Choose a cool color for your shed, maybe one that matches your café. Make sure the doors swing open easily, and if you’re adding windows, they should be the kind that doesn’t break into sharp pieces if they ever get cracked.
Real-World Scenario
Imagine Leo’s Lemonade Stand. Leo’s shop front is 15 feet wide. So, he built his lemonade shed to be 15 feet wide too. He made sure there’s a whole 8 feet of space for people to walk on the sidewalk next to his shed. For the design, Leo used bright yellow wood that’s waterproof and put in shatterproof windows. Now, his lemonade shed looks great and is super safe.
Remember, knowing these rules isn’t just for fun; it’s what you need to do to make your outdoor dining shed dream come true in NYC. Keep it sized right, placed well, and designed safely, and you’ll be on your way to serving happy diners in no time!
Alright, let’s get your ducks in a row for step two. Just like when you’re packing your backpack for a school trip, you want to make sure you have all the right stuff.
2. Prepare the Necessary Documents
Gather Your Proof
First things first, you’ve got to show you’re the boss of the restaurant. This means you need papers that prove you own the place, like a business license. Think of it like showing your library card when you want to borrow a book.
Draw Your Dream
Next up, you’re going to need a drawing of your shed. But not just any drawing – this one has to show all the measurements, like how long and wide it will be. It’s like drawing a map for a treasure hunt; you want to show where everything is.
List Your Building Blocks
Then, make a list of what your shed will be made of. It’s like writing down your ingredients for a recipe. Wood? Metal? Glass? Write it all down. And if you’re planning on brightening up the place with lights or warming it up with heaters, add those to the list too.
Get the Official Okay
You also need to get a thumbs-up from the building that your restaurant is in. This means getting a paper signed that says they’re cool with you building your shed outside.
Keep Neighbors in the Loop
Finally, don’t forget to chat with your neighbors! Sometimes, you need to let the businesses next to you know what you’re planning. Think of it like asking if it’s okay to play music if they’re studying.
Checklist of Documents:
- Business License: This shows you’re the owner.
- Sketch of the Shed: A drawing with sizes and stuff.
- Materials List: Everything you’ll use to build it.
- Building Approval: A paper from your landlord or building owner saying it’s okay.
- Neighbor Notification: Telling the shops next door about your plan.
Quick Tip
Make sure your name and the restaurant’s name are on all your papers. It’s like putting your name on your homework so everyone knows it’s yours.
That’s it! Just like packing for that school trip, double-check you have everything before you head out. Getting these documents ready is a big deal, but if you take it step by step, you’ll have it all sorted out. Then you’re ready for the next big step – sending it all in and getting one step closer to having that awesome outdoor dining shed!
3. Submit Your Application
Send It to the Right Place
Now that you have all your papers ready, it’s time to send them off. Think of it like mailing a letter to Santa; you want to make sure it goes to the right place so your wishes can come true. In NYC, there’s a special department for building and permits that will need to see your application.
Check It Twice
Before you send anything, check over your papers as if you’re looking for Waldo. You want to make sure every “i” is dotted and every “t” is crossed. Mistakes can slow you down, and who wants that?
The Perfect Helper
This part can get super tricky, like trying to solve a tough puzzle. That’s where an architect or contractor can be a game-changer. They know all about building stuff in NYC and how to make your papers as neat as a new coloring book.
Why They’re Awesome
An architect or a contractor is like a guide on a jungle safari; they know the paths, the quicksand, and where the treasures are hidden. They’ll help you fill out the forms correctly, make sure your design is safe, and they even talk the city’s language, which can help a lot.
Handing It Over
When everything’s ready, you or your architect-contractor team will hand over your application to the city. It’s like passing the baton in a relay race – you want to do it smoothly so you can keep running toward your goal.
What Happens Next
Lastly, after your application is submitted, it’s time to wait. But you can use this time to think about fun stuff, like what your first outdoor meal will be when your dining shed is all set up.
Just remember, taking the time to submit your application right the first time can save you a lot of waiting later. So, take a deep breath, double-check everything, and when you’re ready, send it off. Your NYC outdoor dining shed adventure is well on its way!
4. Wait for Approval
Patience is Your Friend
Okay, so you’ve sent in your application. Now, it’s like waiting for your birthday to come around – it takes a bit, but the excitement is building! Getting approval from NYC for your outdoor dining shed can be a bit of a wait. They have to check over every detail to make sure everything’s safe and fits the city rules.
Why the Wait?
Think of it like this: The city’s like a giant library with tons of books to sort through. Your application is like a new book that needs a spot on the shelf. It takes time for the librarians – or in this case, the officials – to find the perfect place for it.
Bring in the Pros
Here’s where having an architect or contractor is like having a super tutor for a really hard homework assignment. They know exactly what the teachers – or the city – are looking for. They turn in your papers neat and complete, which means you could get a gold star – or your permit – faster!
Reducing Wait Time
Firstly, these pros have done this before, many times. They know how to avoid the common mistakes that can slow things down. Next, they’re like your personal delivery service, making sure your application gets to exactly the right person.
Stay on Track
Additionally, these pros can keep track of your application’s progress. It’s like when you order a pizza and you can see it’s being made, then it’s in the oven, and before you know it, it’s at your door! They’ll keep you updated, so you’re not just wondering when it will all happen.
The Finish Line
Lastly, when the permit is finally in your hands, all the waiting feels worth it. Your NYC outdoor dining shed is no longer just an idea – it’s about to become real!
Just remember, while the waiting game can feel long, having an architect or contractor by your side could make the difference between a slow crawl and a brisk walk to the finish line. Hang in there, soon you’ll be setting up tables and chairs outside, ready to welcome your guests to dine under the sky!
Why Hiring a Professional Makes Sense
Navigating the permit process can be daunting. This is where hiring a contractor or an architect can be a smart choice. These professionals can handle the nitty-gritty details, like ensuring your shed meets structural safety standards and is in line with city regulations.
Real-Life Scenario
Take Sarah’s story, for instance. She’s a local NYC café owner who dreamed of expanding her quaint indoor space to the vibrant streets. She hired an architect, and together they designed a charming, compliant outdoor dining shed. Her business is now thriving, thanks to her decision to bring in a pro.
Designing Your Outdoor Dining Shed
When designing your shed, consider:
- Comfort: Your diners’ comfort should be a priority. Choose sturdy, weatherproof furniture and include heating options for cooler evenings.
- Aesthetics: The look of your shed can attract more customers. Aim for a design that complements your restaurant’s theme.
- Safety: Ensure all materials are up to code and pathways are clear to avoid any accidents.
Tips for a Successful Outdoor Dining Shed
- Location, Location, Location: Choose a spot that doesn’t obstruct pedestrian traffic or city utilities.
- Weatherproofing: NYC weather can be unpredictable. Make sure your shed can withstand various weather conditions.
- Accessibility: Your outdoor dining space must be accessible to everyone, including people with disabilities.
Final Thoughts
Getting your own outdoor dining shed up and running in the heart of NYC is pretty cool. It’s your chance to add some spice to the sidewalk and give folks a fresh way to enjoy their eats.
Just like in a game, the prep part is super important. Learn all the rules, get your game plan, and think about teaming up with a pro, like an architect-contractor, to help you score big. They’re like the all-star player who knows how to play the game just right.
So, dream up your little slice of the city that’s all about good food under the open sky. Keep it simple, make it snug, and give it that New York charm. With the right help and a bit of patience, you’ll be dishing out delicious meals in your outdoor dining shed before you know it. Ready, set, go make your sidewalk the new hotspot!